Toadstool Videogame Character Hat Crochet Pattern
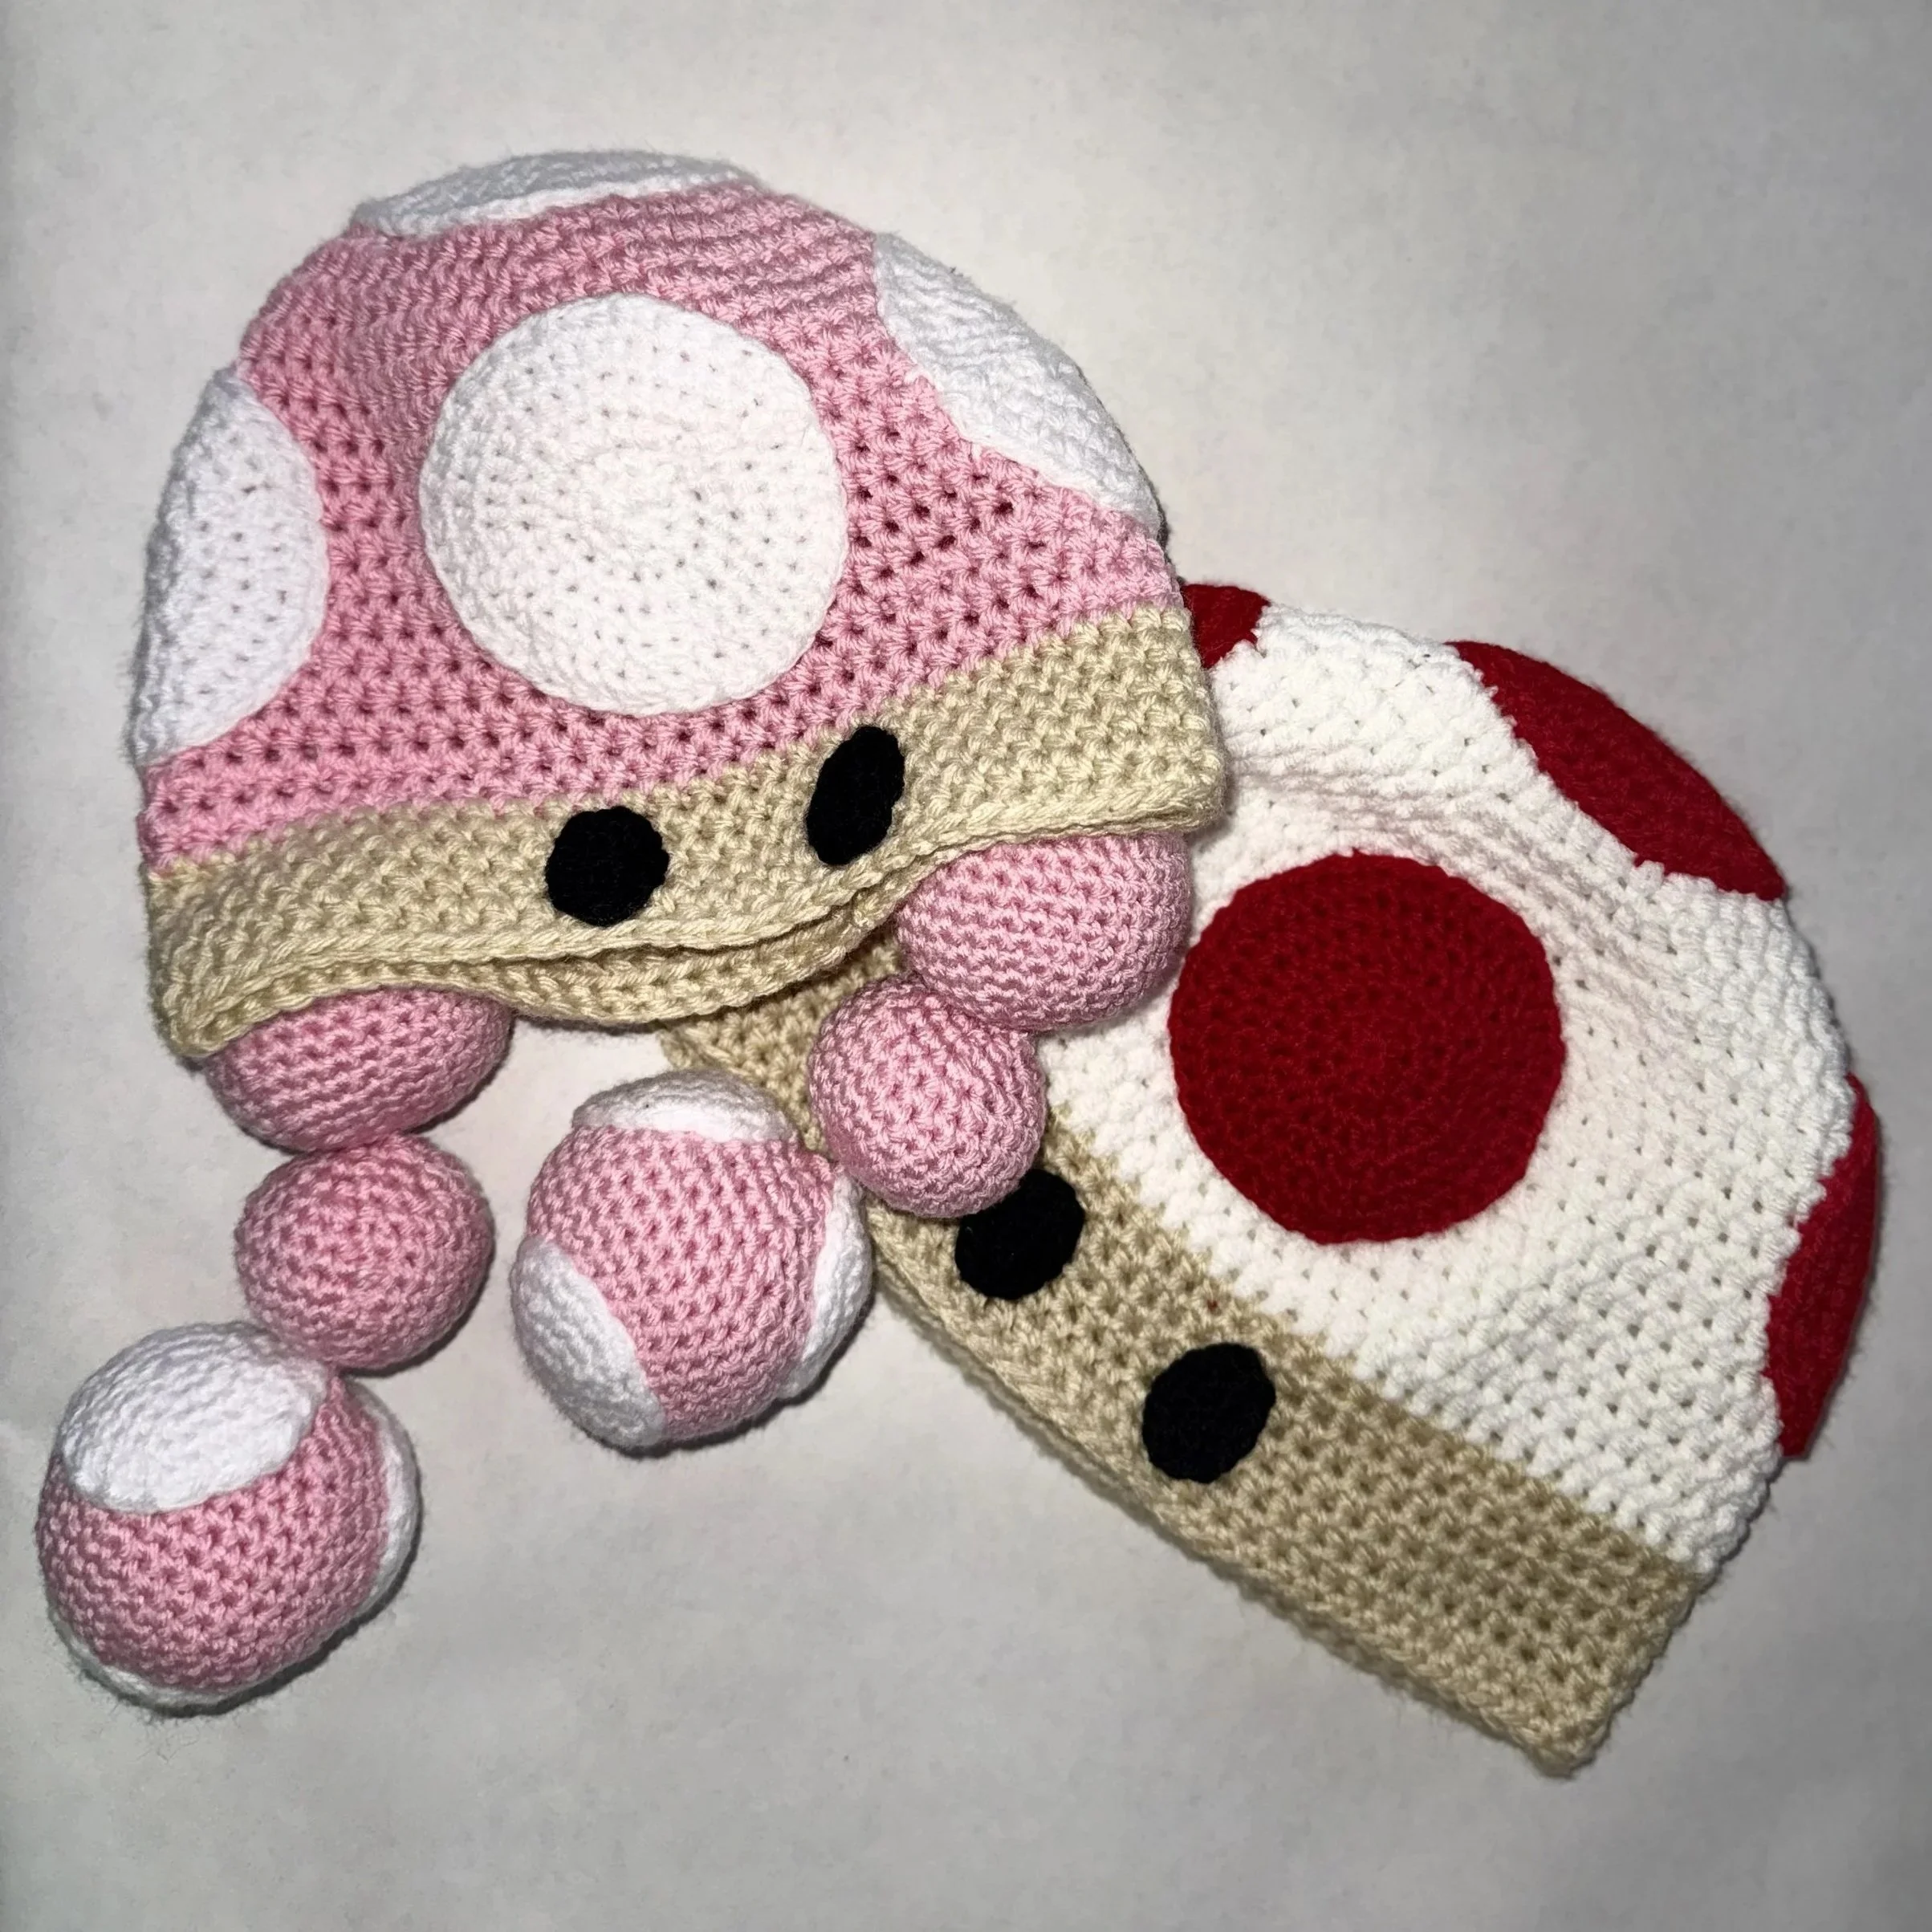
In this tutorial, I am going to be showing you how to create a “Non-Descript Toadstool Videogame character” hat. My son and boyfriend are both huge videogame nerds. I’m a crochet nerd personally, but I do love my fair share of videogames. This is a pattern request from my son, so I had to make it come to life.
Materials
5.00 MM Crochet Hook
4.00 MM Crochet Hook
Darning Needle
Scissors
Stitch Markers
Fiber-Fil
Row Counter (Optional)
4 Tones of yarn
1 color for the Mushroom Cap
I used Loops and Threads Impeccable line in the color “Orchid”
1 color for the Mushroom Stem
I used Loops and Threads Impeccable line in the color “Almond”
1 color for the Polka-Dots
I used Loops and Threads Impeccable line in the color “White”
1 Color for the Eyes
I used Loops and Threads Impeccable line in the color “Black”
Acronyms (U.S. Terminology)
Ch - Chain
SC - Single Crochet
Sk - Skip
HDC - Half Double Crochet
Sl St - Slip Stitch
St - Stitch
Dec - Decrease
Inc - Increase
Size Guide
When Starting a hat with HDC’s in the round, you can use the following guide to determine how many Inc Rounds to create for each size
Infant – 6 Inc rounds (48 St total in the round)
Baby/Toddler – 7 Inc rounds (56 St total in the round)
This is the size I made the pink toadstool hat, with pig-tails
Toddler/Kid – 8 Inc rounds (64 St total in the round)
Average Adult – 9 Inc rounds (72 St total in the round)
Large Adult – 10 Inc rounds (80 St total in the round)
This is the size I made the white toadstool hat
Important Notes
For this entire pattern specifically,
The chain at the beginning of the rounds does not count as a stitch.
The St you Sl St into at the end of a round to close the circle, is also the 1’st St you will either crochet into or Sk in the following round.
When you are closing the rounds for this patter, you always Sl St into the first St of your current round, never the Ch Sp.
Please see the following tutorials for methods I will be using in this pattern, if you need step by step instructions:
For all versions of this hat, you will use the same patterns for the base hat, the eyes, and the Main Hat Polka-Dots. The only difference will be the colors you choose and the additional pieces you will add if you are making a Toadstool hat with Pig-Tails; In which case, you will make the Pig-Tails and six additional Pig-Tail Polka-dots.
Pattern
Base Hat
For this portion of the hat you will need your 5mm crochet hook, yarn in the color you want the Mushroom Cap to be, yarn in the color you want your mushroom stem to be, and scissors.
Step 1: 8 HDC’s in the Magic Circle, Sl St in 1’st HDC of the round (Not the Ch Sp)
8 St total in the round
Step 2: Ch 2, HDC Inc in 1’st St; *HDC Inc in next St, Repeat from * 6 times; Sl St in 1’st HDC
16 St total in the round
Step 3: Ch2, Sk 1’st St; * HDC Inc in next St, 1 HDC in next St, Repeat from * 7 times; HDC Inc in next St, 1 HDC in Sl St of previous round, Sl St in 1’st HDC
24 St total in the round
Step 4: Ch2, HDC Inc in 1’st St; * 1 HDC in each of the next 2 St’s, HDC Inc in next St, Repeat from * 6 times; 1 HDC in each of the last 2 St’s, Sl St in 1’st HDC of current round
32 St total in the round
Step 5: Ch 2, Sk 1’st St; * HDC Inc in next St, 1 HDC in each of the next 3 St, Repeat from * 7 times; HDC Inc in next St, 1 HDC in each of the last 2 St’s, 1 HDC in Sl St of previous round, Sl St in 1’st HDC of current round
40 St total in the round
Step 6: Ch2, HDC Inc in 1’st St; * 1 HDC in each of the next 4 St’s, HDC Inc in next St, Repeat from * 6 times; 1 HDC in each of the last 4 St’s, Sl St in 1’st HDC of current round
48 St total in the round
If you are making an infant size, Sk to step 11.
If you are making a baby/toddler size, continue to step 7.
Step 7: Ch2, Sk 1’st St; * HDC Inc in next St, 1 HDC in each of the next 5 St’s, Repeat from * 7 times; HDC Inc in next St, 1 HDC in each of the last 4 St’s, 1 HDC in Sl St of previous round, Sl St in 1’st HDC of current round
56 St total in the round
If you are making a baby/toddler size, Sk to step 12.
If you are making a toddler/kid size, continue to step 8.
Step 8: Ch2, HDC Inc in 1’st St; * 1 HDC in each of the next 6 St’s, HDC Inc in next St, Repeat from * 6 times; 1 HDC in each of the last 6 St’s, Sl St in 1st HDC of current round
64 St total in the round
If you are making a toddler/kid size, Sk to step 11.
If you are making an average adult size, continue to step 9.
Step 9: Ch2, Sk 1’st St; * HDC Inc in next St, 1 HDC in each of the next 7 St’s, Repeat from * 7 times; HDC Inc in next St, 1 HDC in each of the last 6 St’s, 1 HDC in Sl St of previous round, Sl St in 1’st HDC of current round
72 St total in the round
If you are making an average adult size, Sk to step 12.
If you are making a large adult size, continue to step 10.
Step 10: Ch2, HDC Inc in 1’st St; * 1 HDC in each of the next 8 St’s, HDC Inc in next St, Repeat from * 6 times; 1 HDC in each of the last 8 St’s, Sl St in 1st HDC of current round
80 St total in the round
Step 11: Ch 2, Sk 1’st St, 1 HDC in each St around, 1 HDC in Sl St of previous round, Sl St in 1’st HDC of current round
Step 12: Ch2, 1 HDC in 1’st St and each St around, Sl St in 1’st HDC of current round
Step 13: Ch 2, Sk 1’st St, 1 HDC in each St around, 1 HDC in Sl St of previous round, Sl St in 1’st HDC of current round
Step 14: Repeat steps 12 and 13 until you reach your desired length of the hat
You can use the following guidelines to determine how many rounds to make for an average hat in each size, (but you can make it as long or short as you like):
Infant Size:
If you are following the pattern steps, this is going to be 14 - 21
you will switch to your tan colored yarn at the end of step15/beginning of step 16
If you are counting rounds, this is going to be 10 – 17
you will switch to your tan colored yarn at the end of round 11/beginning of round 12
Baby/Toddler Size:
If you are following the pattern steps, this is going to be 14 – 25
you will switch to your tan colored yarn at the end of step18/beginning of step 19
If you are counting, this is going to be 10 – 21
you will switch to your tan colored yarn at the end of round 15/beginning of round 16
Toddler/Kid Size:
If you are following the pattern steps, this is going to be 14 – 29
you will switch to your tan colored yarn at the end of step 22/beginning of step 23
If you are counting, this is going to be 12 - 26
you will switch to your tan colored yarn at the end of round 20/beginning of round 21
Average Adult Size:
If you are following the pattern steps, this is going to be 14 - 32
you will switch to your tan colored yarn at the end of step26/beginning of step 27
If you are counting, this is going to be 12 - 30m
you will switch to your tan colored yarn at the end of round 24/beginning of round 25
Large Adult Size:
If you are following the pattern steps, this is going to be 14 - 36
you will switch to your tan colored yarn at the end of step30/beginning of step 31
If you are counting, this is going to be 14 - 36
you will switch to your tan colored yarn at the end of round 30/beginning of round 31
OPTIONAL STEP Ch1, loose Sl St in 1’st St and each St around
*Note: This is going to make the hat tighter around the Brim, if you want to keep it loose, you can Sk directly to Step 16.
Last Step: Fasten off and weave in all tails
you will have two in the color of your mushroom cap, and two in the color of your stem
Eyes
For this portion, you are working in a round, but not necessarily a circle. You will be making a chain and crocheting all the way around that chain to make an oval shape. You will need yarn in the color you want the eyes to be, a 4.00 mm crochet hook, Stitch markers, and a darning needle. You will need to make two of these.
Step 1: Ch 5
5 St total in the round
Step 2:2 SC’s in 2nd Ch from hook, 1 SC in next 2 St’s, 3 SC’s in last Ch to turn to the other side of the Ch, 1 SC in next 2 St’s (These are placed in the other side of the two Ch’s you placed 1 SC into each of on the other side), 1 SC in last Ch (Same Ch that you placed your 1’st 2 SC’s of the round in), Sl St in 1’st SC of the round, Ch 1
10 St total in the round
Step 3: 2 Sc’s in same St as last Sl St of round 1, 1 SC in next 4 St’s 3 SC’s in next St, 1 SC i next 4 St’s 1 Sc in same St as 1’st 2 SC’s of the round, Sl St in 1’st SC of the round, fasten off with a long tail
14 St total in the round
Last Step: Weave in the tail that is closest to the center of the eye
Sewing: Align your eyes where you want them to sit on the stem colored portion of the hat. Once you are happy with the positioning of the eyes, use your stitch markers to attach each eye where you want it. Now, use the long tail you fastened off with on Step 3 to sew the eyes to the hat.
Main Hat Polka-Dots
These Polka Dots are for the main hat, The Dot’s specific to the pig-tails are farther down in the pattern. For this portion, you will need the color yarn you want your dots to be, a 4.00mm crochet hook, stitch markers, and a darning needle. You will need to make five of these.
Step 1: 8 HDC’s in the magic circle, Sl St in 1’st HDC of the Magic Circle
8 St total in the round
Step 2: Ch 2, HDC Inc in 1’st St of round 1, HDC Inc in remaining 7 St’s around, Sl St in 1’st HDC of the round
16 St’s total in the round
Step 3: Ch 2, Sk 1’st St; * HDC Inc in next St, 1 SC in next St, Repeat from * 6 times; HDC Inc in next St, 1 HDC in last Sl St of previous round, Sl St in 1’st HDC of Current Round
24 St’s total in the round
Step 4: Ch 2, HDC Inc in 1’st St of previous round, 1 HDC in each of the next 3 St’s; * HDC Inc in next St, 1 HDC in each of the next 2 St’s, repeat from * 6 times; Sl St in 1’st HDC of the current round
32 St’s total in the round
Step 5: Ch 2, Sk 1’st St; * HDC Inc in next St, 1 HDC in each of the next 3 St’s, Repeat from * 6 times; HDC Inc in next St, 1 HDC in last 2 St’s of round, 1 HDC in last Sl St of previous round, Sl St in 1’st HDC of current round
40 St’s total in the round
Step 6: Ch 2, HDC Inc in 1’st St, 1 HDC in next 4 St’s; HDC Inc in next st, 1 HDC in next 4 St’s, Repeat from * 6 times; Sl St in 1’st HDC of current round, fasted off with a long tail
48 St’s total in the round
Last Step: Weave in the tail that started your magic circle
Sewing: Align the polka-dots where you want them to sit on the hat. there will be one centered directly above the eyes, one in the exact same spot on the pack of the hat, one on each side of the hat, and one centered directly on top. Once you are happy with the positioning of the polka-dots, use your stitch markers to attach each one where you want it. Now, use the long tail you fastened off with on Step 6 to sew the polka-dots to the hat.
Pig-Tail Balls
For the pig tail balls you will need the same color yarn you used for the mushroom cap, 4.00mm Crochet hook, stitch markers, and a darning needle. You will need to make two of each size of these.
Step 1: 5 SC’s in Magic Ring, Sl St in 1’st SC or the Magic ring
5 St total in the round
Step 2: Ch 1, SC Inc in 1’st St and each of the next 4 St’s around, Sl St in 1’st SC of the current round
10 St total in the round
Step 3: Ch 1, Sk 1’st St; * SC Inc in next St, 1 SC in next St, Repeat from * 4 times; Sl St in 1’st SC of the current round
15 St total in the round
Step 4: Ch 1, SC Inc in 1’st St, 1 SC in each of the next 2 St; * SC Inc in next St, 1 SC in each of the next 2 St’s, repeat from * 3 times Sl St in 1’st SC of current round
20 St total in the round
Step 5: Ch 1, Sk 1’st St; * SC Inc in next St, 1 SC in next 3 St’s, repeat from * 4 times Sl St in 1’st SC
25 St total in the round
If you are making the small sized middle ball of the pig-tail, skip to step 8
If you are making the large sized end ball or the middle sized starting ball of the pig-tail, continue on to step 6
Step 6: Ch 1, SC Inc in 1’st St, 1 SC in each of the next 4 St’s; * SC Inc in next St, 1 SC in each of the next 4 St’s Repeat from * times; Sl St in 1’st SC
30 St Total in the round
If you are making the middle sized starting ball of the pig-tail, skip to step 9
If you are making the large sized end ball of the pig-tail, continue to step 7
Step 7: Ch 1, Sk 1’st St; * SC Inc in next St, 1 SC in each of the next 5 St’s, Repeat from * 4 times; Sl St in 1’st SC
35 St total in the round
Step 8: Ch 1, SC around to the end, Sl S in 1’st SC
Small Ball - 25 St total in the round
Mid Sized Ball -30 St total in the round
Large Ball - 35 St total in the round
Step 9: Ch 1, Sk 1’st St, SC around to the end, Sl St in 1’st SC
Small Ball - 25 St total in the round
Mid Sized Ball -30 St total in the round
Large Ball - 35 St total in the round
Step 10: Ch 1, SC around to the end, Sl St in 1’st SC
Small Ball - 25 St total in the round
Mid Sized Ball -30 St total in the round
Large Ball - 35 St total in the round
If you are making the small sized middle ball of the pig-tail, skip to step 12
If you are making the large sized end ball, or the middle sized starting ball of the pig-tail, continue on to step 11
Step 11: Repeat Rows 9 & 10 each 1 time
Mid Sized Ball -30 St total in the round
Large Ball - 35 St total in the round
Step 12: Ch1, Sk 1’st St, SC around to the end, Sl St in 1’st SC
Small Ball - 25 St total in the round
Mid Sized Ball -30 St total in the round
Large Ball - 35 St total in the round
If you are making the small sized middle ball of the pig-tail, skip to step 15
If you are making the middle sized starting ball of the pig-tail, skip to step 14
If you are making the large end ball of the pig-tail, continue on to step 13
Step 13: Ch 1, SC Dec, 1 SC in each of the next 5 St’s; * SC Dec, 1 SC i each of the next 5 St’s, Repeat from * 3 times, Sl St in 1’st Dec
30 St total in the round
Step 14: Ch 1, Sk 1’st St; * SC Dec, 1 SC in each of the next 4 St’s, Repeat from * 4 times, Sl St in 1’st Dec
25 St total in the round
Step 15: Ch , SC Dec, 1 SC in each of the next 3 St’s; * SC Dec, 1 SC in each of the next 3 St’s, Repeat from * 3 times; Sl St in 1’st Dec
20 St total in the round
Step 16: Ch 1, Sk 1’st St; * SC Dec, 1 SC in next 2 St’s, Repeat from * 4 times; Sl St in 1’st Dec
15 St total in the round
Pause Here: Place a stitch marker in the current loop on your hook and remove your hook. Turn the ball inside out to weave in the tail from the magic circle. Once that is weaved in sufficiently, you will turn the ball right-side-out again and begin filling it with fiberfill until it is full up to your current round
Step 17: Ch 1, SC Dec, 1 SC in next St; * SC Dec, 1 SC in next St, Repeat from * 3 times, Sl St in 1’st Dec, place a little bit more fiber fill to account for the new round
10 St total in the round
Step 18: Ch 1, Sk 1’st St, SC Dec all the way around, Sl St in 1’st Dec, place enough fiberfill to fill out the remainder of the ball, Fasten off with a long tail
5 St total in the round
Pig-Tail Polk Dots
For the Pig-Tail Polka-Dots, you are going to need the same color you used for your large polka-dots, a 4.00MM crochet hook, stitch markers, and a darning needle. you will need to make 6 of these.
Step 1: 6 SC’s in the Magic circle, Sl St in 1’st SC
6 St total in the round
Step 2: Ch 1, SC Inc in 1’st St and each St around, Sl St in 1’st SC
12 St total in the round
Step 3: Ch 1, Sk 1’st St; * SC Inc in next St, 1 SC in next St, Repeat from * 5 times, Sl St in 1’st SC
18 St total in the round
Step 4: Ch 1, SC Inc in 1’st St, 1 SC in each of the next 2 St’s; * SC Inc in next st, 1 SC in each of the next 2 St’s, Repeat from * 4 times, Sl St in 1’st SC
24 St total in the round
Step 5: Ch 1, Sk 1’st St; * SC Inc in next St, 1 SC in each of the next 3 St’s, Repeat from * 5 times, Sl St in 1’st SC
30 St total in the round
Step 6: Ch 1, SC Inc in 1’st St, 1 SC in each of the next 4 ST’s; * SC Inc in next St, 1 SC in each of the next 4 St’s, Repeat from * 4 times; Sl St in 1’st SC, fasten off with a long tail
36 St total in the round
Last Step: Weave in the tail that is closest to the center of the eye
Sewing: Using your stitch markers, align your small polka-dots where you want them to sit on the largest of each pig-tail ball. You place three on each. I was more arbitrary about the placement of these dots and just placed them wherever they were not touching each other. Once you are happy with the positioning of the polka-dots. Now, use the long tail you fastened off with on Step 6 to sew the polka-dots to the ball.
Sewing Pig-Tails to the Hat
Finally, you are going to attach the pig tails to the hat. Keep your hat right side out, but flip it so it is laying with the back side up. place a stitch marker 3 stitches away from each edge because you are going to go through this process twice. One for each pigtail.
Take your middle sized ball and use your darning needle to wrap the finishing tail around the stitch you have marked. Wrap it around once until the tail is on the inside of the hat. Use a sewing knot to hold the ball in place and then weave in the tail.
Take your smallest ball, and position it so the finishing tail is lined up with the bottom center of the middle ball. Use your darning needle to send that tail straight through the center of the middle ball that is now attached to the hat. send the needle through one of the closing stitches of the midsized ball and then wrap it around the same stitch that was stitch marked until the tail is on the inside of the hat. Use a sewing knot to hold the ball in place and then weave in the tail.
Grab your largest ball, and position it so the finishing tail is lined up with the bottom center of the smallest ball. Use your darning needle to send that tail straight through the center of the smallest ball followed directly by the middle that is now attached to the hat. send the needle through one of the closing stitches of the midsized ball and then wrap it around the same stitch that was stitch marked until the tail is on the inside of the hat. Use a sewing knot to hold the ball in place and then weave in the tail.